Showing posts with label Garnier. Show all posts

Saturday, December 10, 2016

Review - Garnier Micellar Cleansing Water


Hello gorgeous!

Weekend is here! And it’s holiday time for me, hurraaahhh! We are going to travel to Australia for 2 weeks and I’m extremely excited because it was years ago since the last time we went there. I promised will do a blogpost about my trip there and also a peek on what I bring along inside my beauty pouch bag. Yang sudah pasti masuk dibawa adalah yang berikut ini nih: Garnier Micellar Cleansing Water! Baca reviewnya di bawah ini yuk!

Bulan lalu aku dikirimi satu paket cantik dari Garnier Indonesia. Box berwarna putih dengan aksen pink ini berisi dua buah Garnier Micellar Cleansing Water, yaitu Garnier Micellar Cleansing Water (botol warna pink untuk kulit normal/sensitif) dan Garnier Micellar Cleansing Water Pure Active (botol warna biru untuk kulit berminyak/berjerawat). Garnier juga menyertakan satu box berisikan cotton pad untuk menghapus makeup, pengertian banget deh hehehe.. 


Buat kamu yang belum tahu, Micellar Water itu adalah pembersih wajah yang bertekstur seperti air yang dapat mengangkat debu, kotoran, bahkan waterproof make-up secara lembut tanpa perlu dibilas. Pembersih ini mengandung Micelle yang bekerja efektif seperti magnet untuk mengangkat kotoran-kotoran di wajah.


Garnier Micellar Cleansing Water dikemas di dalam botol plastik bening dengan aksen pink dan biru. Tutupnya flip top dan cukup aman, produk tidak akan mudah tumpah. Kemasannya juga termasuk compact alias mudah dibawa kemana-mana karena tidak terlalu besar tapi juga tidak terlalu kecil. Dibawa travelling ok, masuk ke tas gym bisa, diselipin di tas kantor juga bisa. 

Dari namanya saja sudah jelas bahwa teksturnya seperti air, benar-benar cair byurrrr hehehe.. Pemakaiannya tinggal tuang ke kapas bersih, lalu diusapkan ke wajah untuk mengangkat make up kamu. Aku biasanya menghabiskan 3-4 kapas untuk membersihkan wajah dan leher sampai benar-benar bersih dan tidak ada bekas make up apapun di wajah. 


Micellar Water ini juga bisa digunakan untuk menghapus make up waterproof lho. Di foto, aku menggunakan mascara waterproof dan aku hapus dengan cara menempelkan kapas di bagian bulu mata sebentar sebelum aku usapkan. 

Bandingkan antara bagian kiri yang sudah bersih dan bagian kanan yang masih bermakeup


Senangnya wajahku tidak terlalu terasa lengket sesudah dibersihkan dengan Garnier Micellar Cleansing Water. Pada saat pembersihan, tidak ada rasa pedih di bagian mata, tapi kemudian ada sedikit rasa tidak nyaman di mata setelah pembersihan walaupun tidak terlalu mengganggu.
Aku mencoba membersihkan wajahku dengan menggunakan kedua varian, sebelah kiri dengan yang warna pink dan sebelah kanan dengan yang warna biru. Tapi aku tidak terlalu merasakan perbedaan antara keduanya. Varian warna biru yang diklaim untuk kulit berminyak, tidak membuat kulitku terasa kering setelah pembersihan, jadi sepertinya cukup aman untuk dipakai orang yang berkulit normal. Kalau aku sih karena kulitku termasuk kering, jadi untuk amannya, aku lebih suka menggunakan varian yang pink yang diformulasikan untuk kulit normal/sensitif. 


Kalau dari segi harga, wah ini yang paling oke deh jika dibandingkan dengan merek lain yang menawarkan produk yang serupa. Untuk ukuran 125ml, Garnier Micellar Celansing Water dibanderol seharga 30.000 IDR saja.


Pembersih make up seperti ini bukan yang pertama kali aku coba dan memang solusi yang cepat dan simple kalau sudah lagi terlalu capek atau buru-buru butuh membersihkan wajah. Kalau kamu sendiri bagaimana? Sudah pernah mencoba Micellar Water sebagai pembersih wajah? Tinggalkan komen di bawah ya jika kamu merasa Garnier Micellar Cleansing Water adalah pembersih wajah andalan kamu.

Wajah bersih tuntas dari makeup
Detail FOTD:
Foundation : Three Cosmetics Foundation
Eyes : Chanel Les Ombres in Poesie
Blush : Tarte Amazonian Clay Blush On
Lips : IOPE Water Fit Lipstick No.44
Mascara : Beauty Story Midnight Dream Mascara

Cheers,
Stef

Thursday, April 21, 2016

Review - Garnier Light Complete White Speed Super Essence

Hello gorgeous! 
I’m back today with an update on Garnier Light Complete White Speed Super Essence. I had used it for one week and let’s dig in on how this Super Essence works on me.


Let’s talk about the packaging and the texture first. The packaging is in small tube dominated with white and yellow colors (Garnier White Speed color). The tube has a screw top instead of pop cap. The serum texture is quite runny, so please be careful when you opened the cap. I usually will open it with the mouth of the tube facing up, that way the serum will not spill out easily. The serum color is like diluted milk, almost transparent color. 


Due to the light and runny texture, you don’t need a lot of it to apply to your face and neck. I like how the serum is light and absorbed quite easily on the skin. The scent is refreshing with a little bit of lemon scent. No need to worry because the scent will fade away quickly. I apply it evenly to my face and neck twice a day before my moisturizer. 


During my usage of Garnier White Speed Super Essence, I felt that my skin started to feel really dry starting on the fourth day. My So, I added SK-II Facial Treatment Repair C before applying Super Essence. I also opted my creamier and high hydration moisturizer to seal everything up. My skin felt better, but until day 7, my skin still felt dry and started to look a bit dull because of it. 


My utmost skin problem is my skin pigmentation aka spots all over my face. I tried many spot controlling products but to no avail, the spots are still there *cry* even though they claimed to make the spots disappear or fade away. Well, guess what? Not even close to fading away. Garnier White Speed Super Essence is no exception, also failing on controlling my spots. But, I did notice that my acne scars disappeared rather quickly than usual and leave my skin smooth again. As for the brightening effect, I could not say much because my skin is already on the fair side, so there are not much difference between before and after.


So that’s my take on Garnier Light Complete White Speed Super Essence. I also inserted an image of Garnier Light Complete White Speed guidance in applying the skincare products to get that bright and lovely complexion. Hope this review will help you and have a lovely day, gorgeous people!

Cheers,
Stef
PS: The product is sponsored by Garnier Indonesia for review purposes but rest assured that all reviews in my blog are based on my personal experienced despite being sponsored or bought personally. 

Wednesday, April 6, 2016

Unboxing - Garnier Light Complete White Speed Super Essence


Hello gorgeous!

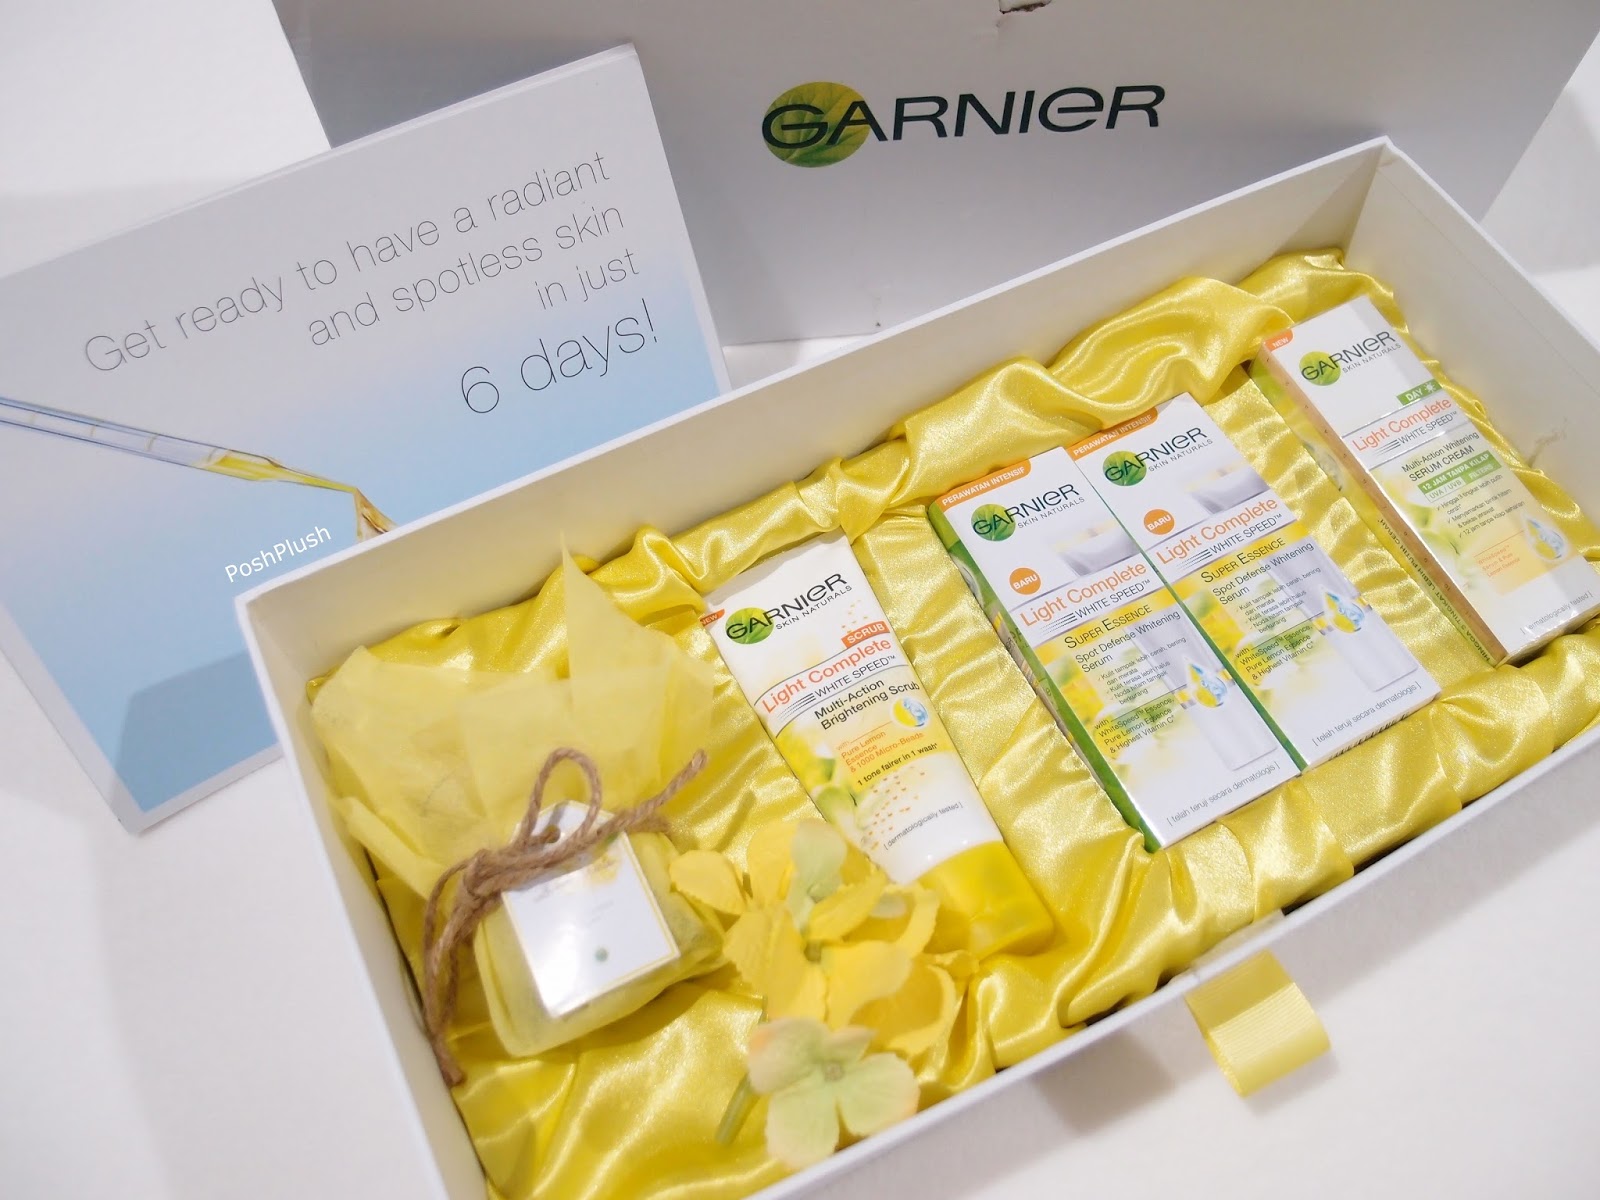
Last month, I got a big white box with a yellow ribbon from Garnier Indonesia. Apparently it’s a hamper filled with Garnier Light Complete White Speed products. Garnier is going to launch their newest whitening serum called Garnier Light Complete White Speed Super Essence, a concentrated anti-spot whitening serum. Curious of what’s inside the box? Let’s find out together!


The box is from sturdy cardboard and you have to open it like opening a drawer. My box got a little dent on the top due to the shipment, hiks.. so pardon the little flaw on the picture. When I opened it, I could smell a soft scent of lemon from the box. The lemon scent coming from a small yellow lemon candle, so cute! Inside the box, I found 4 products, all from Light Complete White Speed Series. 


The brightening scrub, serum cream, and the super essence (they send me 2 boxes). I have reviewed Garnier White Speed Brightening Scrub and Serum Cream on my blog last year.


And now Garnier has the newest addition to the family which is the Super Essence, a concentrated anti-spot whitening serum. This serum claims to help reduce the skin darkening from melanin just within 6 days. Sounds awesome, yes? And a perfect timing too since the sun has been scorching hot lately. I hope that this serum will come to the rescue for discoloration and uneven skin tone. 


I’m going to try on this new serum for 6 days and will update you with the result next week. See, I told you that this is going to be a short post. Wish me luck and stay tune on my blog for the updates!

Cheers,
Stef

Tuesday, August 4, 2015

Event : Garnier Vlogging Retreat


Hello gorgeous! First, I would like to say Happy Eid Mubarak for everybody who celebrated it. I bet all of you had a wonderful and joyous celebration with your beloved ones. Me and my family had an early holiday before the Idul Fitri started and back in time for the empty Jakarta and enjoy the friendly traffic. Oh how I wish the traffic would stay that way every day. Life will be so much easier hahaha..

Anyway, this is an update on the beauty event that I attended. I am one of the lucky beauty bloggers that got a chance to join Garnier Vlogging Retreat. The retreat was held on June 6th & 7th, 2015 at Padma Hotel, Bandung. Following its Light Complete White Speed series, Garnier invited us to learn more about vlogging, its tips and tricks, and how to make a good video that attracts millions of viewers (dream high people, dream as high as we could!) 

What is vlogging? Please do not mistaken it with mosquito fogging, ok? Hahaha
Vlogging is another form of blogging, using video as its media instead of blog. For some people, talking is easier than writing, and vice versa. So, it’s a good news for you who always been wanting to blog but got discouraged because you don’t know how or what to write. With Vlogging, you just need to talk in front of the camera! I know its easier said than done, because for me, writing is definitely easier and learning about Vlogging is something new and quite challenging for me. Want to know more about it? Let me tell you all about it now.

Day 1, June 6th 2015.
We went to Bandung using a bus and arrived at Padma Hotel around 9.30 am. The hotel was beyond beautiful! Amazing view with green lush trees all over the complex. I couldn’t believe that we are going to stay in this hotel. I am totally in love with this hotel! After having breakfast and get to know other beauty bloggers, we started our workshop.


The workshop began with an opening talk from Mr. Pandu Brodjonegoro, Senior Brand Manager Garnier. It continued with the Vlogging Workshop presented by Ms. Priskila Eirene. She explained what is Vlogging and how to make a good one.


The workshop was divided into 4 parts and I will summarize it below.

1. Vlogging Preparation
First of all, you need to know what you are going to talk about in your video. Are you going to talk about product review or a makeup tutorial, or etc. Make sure that you are focus and not straying from out topic. Making notes before you shoot your video and rehearse it a bit might help too. 

2. Filming


Make sure you have a proper equipment to shoot your video. You don’t need to buy the latest video camera model though, especially when you are just starting your vlogging adventure (unless budget is not an issue).
A tripod would do great too instead of putting your camera on the stack of books or CDs (yes, I’m guilty). 

Lighting is important because you want to show your viewers the colors of your make up or the products that you want to review clearly. 
You also need to pay attention to the background and your filming environment too. Many amateurs forget that the viewers will be able to see what’s behind them aka the messy bedsheet, piles of dirty laundry, and other chaos that usually sits on your house. Make sure you have a background that is pleasant to see or at least a clean one, so the viewers will not be distracted by things such as guessing what leftovers on the table or what size is your bra ;p

Quiet the space where you do your shooting. It is going to be embarrassing if in the middle of your explanation on how to make smoky eyes then your mom yells, asking for you to do your chores. Put a do not disturb sign outside the door if you needed to.

Don’t forget to to a 5 seconds test to ensure your settings are all alright and the video quality is good.

3. Editing
We all have different types of camera and computer, so finding an editing software that fits you and your equipment is important too. If you are an Apple user, you can use iMovie. Windows user can use Windows Movie Maker. And if you wanted to step up your game and do it professionally, you can check out Adobe Premiere.

Separate the video materials into 3 parts, Title – Content – Ending. That way, you can edit them better and easier. Play and make yourself familiar with the editing software so you can optimize the functions.

Remember to add an End Screen in your video. What is an End Screen? It’s a page where you type all your social media contacts or even a teaser of your upcoming videos, so your viewers will remember to check for your updates.

4. Branding
Branding your video channel is vital because not only your viewers will remember you, but a good brand will also attract more and more viewers. Here are some tips that I got from the workshop:

  • Choose a great youtube name

  • A great name sometimes is not enough, why don’t you also create your own logo?

  • Establish social media presence. Be active but still in the proper amount.

  • Interact with your audience. Ask them questions and answer their questions.

  • Create a memorable content that your viewers will remember.

  • Make a good youtube thumbnail image to interest viewers.

There you go! Vlogging 101 is finished! Last but not least, in making videos, you need to have fun and be passionate about what you record. 

During the workshop, we were also being encouraged to shoot our own videos to be uploaded later in our youtube channel. After each session, we were given the chance to put what that had been taught to us into practice. We learned how to shoot, edit, and upload our own videos under Kila’s help. It was a new experience for me and I have to fight my self conscious in front of the camera. But it was fun doing it together with other bloggers. We helped each other in shooting and editing the videos. The result is not that bad after all hahaha.

The sun set and the workshop is finished. It’s time for us to check in to our hotel room and get ready for the dinner. Look what we found on top of our bed! My roommate is Kania from www.beautydiarykania.com. A lovely and kindhearted woman with long beautiful hair. We met before on other beauty event, so we’re not strangers anymore. 


The dinner was set in a romantic lighting which was a bit upsetting for us because we could not take a proper picture of us and our makeup hahaha.. The food was delicious especially the dessert, a chocolate lava cake with vanilla ice cream on the side.
With a full tummy and tired body, it’s time to call it a night. We still have more activities to do on the next day.

Day 2, June 7th 2015
 
The day started with a very early morning call at 6 am. You guys know I am not a morning person, so I literally have to drag my ass out of the bed and get ready to join the yoga session. As it turned out, the ass dragging got rewarded with a very refreshing Bandung morning air. The air was super fresh and cold, a wonderful change from the dusty air in Jakarta. I inhaled as much as fresh air that I could while I can.

The yoga session was led by Fey Astora from Astora Yoga. His yoga expertise and his charm definitely woke us up that morning hahaha.. It was my first time doing yoga with a proper instructor and my muscles were sore afterwards, but I like it. 


Calories burning done, then its time to input some calories in again hahaha.. Having breakfast at the hotel restaurant and more chit chat with the others. Afterwards, some of us went for a dip in the swimming pool. As for me, I prefer to relax in the bathtub, enjoying my last moment staying in this beautiful hotel.

After checking out of the hotel and some group photo sessions, we went to Miss Bee Providore for lunch. Miss Bee has been on my list for the must try restaurants in Bandung. The venue is dominated with yellow color hence the name. There’s a little playground for kids and they have rabbits too! The food portion was generous (I couldn’t finished mine) but the taste was just okay. The dessert was great though (they almost sold out so we have to share). 


We arrived in Jakarta around 7.30 pm (the traffic to Jakarta was really bad) and that’s the end of the retreat. We said our goodbyes and went back to our home. Thank you Garnier Indonesia for this fun and fruitful retreat. I got to meet fellow beauty bloggers, learned about new things, and it was an awesome experience. Wishing Garnier success all the way. Until next time!!


Cheers,
Stef