Showing posts with label Urban Decay. Show all posts

Wednesday, October 28, 2015

Halloween Look - Porcelain Doll (Pretty, Broken, and Hollow Eyed)


Hello everybody! It’s me again here.. back with my Halloween Look part II. 

This time, I try to recreate a porcelain doll from pretty one to hollow eyed doll. Porcelain doll sometimes gives me a creep with their big eyes and well their eyes basically. I was inspired by BJD dolls too. BJD stands for Ball Jointed Dolls. The dolls are very beautifully made with human like appearance. I was trying to achieve that kind of look, but of course the plan on my mind and my makeup ability is not synchronized. So, this is the best porcelain doll look that I can make so far. It’s my first time creating it too, so I don’t have any comparison actually hahaha..

Sooo gorgeous!! Pic from here
My hollow eyed look inspired by Lex from Madeyewlook. Check her youtube account, you can find other tutorials from creepy one to cute one such as emoji makeups. She’s awesome!  

Before all that makeup magic


I spent 3 hours for creating this look, a lot longer than the previous vampire makeup. Simply because at first, I don’t know what to do hahaha.. So after finished putting on my base makeup, I was like uhmmmm, what should I do next? I watched doll makeup tutorials but I was really nervous that I’m going to make a mistake and ruin my whole look, so I literally just stopped and stared at my reflections on the mirror. I tried to watch some makeup tutorials again to help me gain my confident back and started to work on the look.
Same as the previous post, I will not give a tutorial on the look because my makeup technique is down beyond par the others and still need a lot of improvement. But, I will give you some important notes that could help you create this look. I did photoshopped my face a little bit which is removing all my moles to achieve the porcelain skin. But the other parts are real makeup, no photoshopped or even beauty camera.

Sssshhh!! Don't tell anyone that I will come to play

 
  • Primer before makeup. Porcelain doll has porcelain skin which is smooth and poreless. A pore perfecting primer to cover your pores will be an excellent choice for this look.

  • Thin or natural eyebrows. A gentle stroke with your eyebrow pencil to define your eyebrows. A porcelain doll should look delicate not fierce.

  • White eyeliner to make your eyes look bigger.

  • Take out your fabulous lush falsies to play. This time, we go big. Upper lashes and lower lashes should have falsies to achieve that dolly eyes.

  • Go crazy with your circle lens too. The bigger the better.

  • Shading and highlighting is always on the game. Contour your nose, philtrum (upper lips area), and chin.

  • A rosy lips and cheeks to complement the look


Now, some points for making the creepier porcelain doll look.

  • Practice your crack drawing before hand to make sure your cracks look real. Don’t be afraid to make mistakes, a cotton bud with makeup remover can always solve the problem. I use liquid eyeliner to create the cracks.

  • Cover your lips with foundation and use black eyeshadow to make a dark gradient lips. If its not dark enough, add black eyeliner on your inner lips.

  • To create sunken eyes, swipe black eyeshadow around the hollow of your eyes. Don’t forget to blend it well.

  • To create hollow eyed, use your black eyeliner all over your eyelid and lower eyes with the guidance of that hollow part of your eyes. Blend it with black eyeshadow to create an illusion that your eyes are hollow.

  • Took off your all your falsies when you take picture of the hollow eyed look because errr no eyes means no falsies, rite?

Products that I used:

Benefit The Porefessional Primer
Shu Uemura Lightbulb Foundation shade 764
PAC Creamy Foundation in White
Beauty Story Luminous Primer
Shu Uemura Eyebrow Pencil Hard Formula in Seal Brown
Etude House Color My Brow shade No. 4 Natural Brown
Urban Decay 24/7 Eyeliner in Zero
Urban Decay Naked On The Run Palette shade Fix (to contour) and Dare (for the eyes)
Urban Decay Eyeshadow Perversion (black color)
Eyeko Eye Do Liquid Eyeliner
Make Over Eyeliner Pencil in White Techno
Etude House Cookie Blusher in Marshmallow Pink
Colourpop Lippiestix in Fetch
Make Up Forever Artist Plexi Gloss No.201
No brand falsies that I bought in Bangkok
Kawaii Angel Circle Lens in Gray (bought from Kawai Gankyu)
Kimiko Wig in Coffee Brown (bought from Pinokobeauty)

That’s all I guess. I had so much fun creating this look and my sister helped take pictures of me. I supposed it’s not that scary when it’s daytime but I don’t think I will do it on night time hahahaha..

Creepy Dolls can have fun too ;)
Which Halloween makeup that you like more? The vampire look or this porcelain doll look?
Are you ready for Halloween now?? Cannot wait for next Halloween to create more fun and creepy look.

Cheers,

Stef


Halloween Makeup - Vampire Look

Helloooo again gorgeous!
As you all know, October is Halloween month anddd Halloween is an event where once in a year all the makeup artist go full throttle and all out in squeezing their each drop of creativity to look spooky, scary, or even magnificent. I love browsing through Instagram; using #halloweenmakeup #halloweenmakeupideas #halloweenmakeupinspiration #halloweenmakeuplook and looking at all those amazing makeup.  

This Halloween, I finally collect my courage to do a Halloween makeup look. I never dare to make one before because I thought that I will never be able to do those things (especially the ones with special effects and all). But then I really wanted to do something different on my blog other than just reviewing products, so I took the chance and just do it. 


The look I created is a vampire look. I chose this because it's the infamous Halloween look that has been done by many people in the world, so I could get as many references aka tutorials as I could. I love watching those tutorials because it amazes me how those makeup artists or makeup gurus able to transform their faces into something totally different by just using makeup. You should’ve seen my face reaction when I watched those Halloween tutorials. I was like woowww.. ooohhh… aahhhh.. being awed by their skills painting their faces :D 

One tutorial that particularly inspired me is from Michelle Phan's. It's an old video from 6 years ago where she did a tutorial about a seductive vampire look. Click here for the video link
I will not giving you a Halloween makeup tutorial in this post, but only going to describe what I did when I did my makeup, so it’s more into the basics that you need to remember if you wanted to make similar look. Ok, let’s start now.

  • Prep your skin with your usual skincare routine. Make sure that your skin is toned and moisturized before you put any makeup on.
  • Vampire skin is pale and smooth. Remember to use a primer (a pore perfecting primer) before you apply foundation to achieve that poreless and smooth vampire look. As for the pale shade, use a foundation that is 2-3 times lighter than your usual shade. I mixed my foundation with a white foundation cream to get a lighter shade. Apply the foundation onto your neck too to avoid looking like you’re wearing a mask.
  • Don’t forget to shade and highlight your face. Vampires usually have defined cheekbones, jaws, and nose bridges.
  • No blush needed. Have you ever saw Edward Cullen cheeks flushed??
  • Black eyeliner is a must. Period.
  • No false lashes unless you are trying to be a vampire doll or vampire Barbie.
  • Fangs are optional. With or without you will still look pretty *smooch* 


Products that I used are the following:

Benefit The Porefessional Primer
Shu Uemura Lightbulb Foundation shade 764
PAC Creamy Foundation in White
Urban Decay Book of Shadows Vol III shade Rockstar and Last Call
Urban Decay Naked On The Run Palette shade Fix (to contour) and Dare (for the eyes)
Stila Chocolate Palette (using the dark brown color for the eyes)
Shu Uemura Eyebrow Pencil Hard Formula 9 in Seal Brown
Urban Decay 24/7 Eyeliner in Zero
Dior Diorshow Waterproof Mascara
IOPE Colorfit Lipstick No.18 Classic Red (I mixed it with the black eyeliner to achieve a darker red on the lips)
Kawaii Angel Circle Lens in Gray

As this is my first attempt on doing a Halloween makeup, so please forgive me if there are a lot of flaws here and there. I should’ve worn a lighter shade of lens to really give a good contrast on the eyes makeup because that’s actually is all about for this look. But I supposed this lens will do too. I did not contour my face bolder and as a result, my face is not defined and chiseled enough. But nevertheless, I had a great time creating this look and having fun with it. 

This vampire look is pretty easy to make and I think is very versatile too. You can tone it down a notch and it can become your going-on-a-party smokey eye kind of look. 

I’m actually preparing another Halloween look for this year and hopefully I can post it on time here on my blog. The clue? It involved a wig and another circle lens. I hope you enjoy reading this post and get inspired to do Halloween makeup too. What is your Halloween makeup this year? Who is your favorite makeup artist or your favorite Halloween makeup look this year? If you did a Halloween makeup, please say Hi to me on my IG and I will check on yours.

Cheers,

Stef


Saturday, October 17, 2015

Swatches - Urban Decay Book of Shadows III New York Palette

Hello gorgeous!
It's weekend and how is your weekend so far? I don't go anywhere today and just spend my saturday cleaning up my drawers and room. Guess what I found? My precious item, Urban Decay Book of Shadows Vol. III aka The New York Palette. I fell in love at first sight with this palette. It is so gorgeous! The colors are amazing and let's not forget the pop up  paper art of New York City. Major love here!!
It comes with two travel size 24/7 eyeliners, Zero and Ransom. And also a small size of Urban Decay Primer Potion. I had used all of them, so it will not be shown here.


I had this palette for quite a while but haven't got the chance to swatch them all. So here you are, for your eyes entertainment, the swatches of Urban Decay Book of Shadows Vol. III - New York Palette.


They are fabulous aren't they? Do you have precious makeup palette that you cherish a lot? Please share with me. Have a great weekend, dear :)

Cheers,

Stef

Tuesday, August 25, 2015

Urban Decay Naked On The Run Palette


Who doesn’t know about Urban Decay especially their Naked line? 
I bet many of you swear on their Naked palette as your HG and never can go wrong makeup palette. I read so many reviews about those palettes and really wanted to get one for myself, but I still haven’t been able to make up my mind on which palette that I want to purchase until this day. Then, comes along this Naked On The Run palette.


I bought it for quite some time ago but haven’t got the time to do a full review for it. The palette is definitely a must have for every make up lover because it is so pretty and versatile. I love travelling palette that usually consists of eye shadows and blush on. I have Stila Chocolate palette that I like so much because it consists of 3 neutral eye shadows (light shimmery beige, copper gold, and deep dark chocolate) and a shimmery peachy pink blush. I always carry it every time I travel, especially when I just need to travel for 2-3 days and doesn’t need to carry too many make up products or when I just want a simple and fast good to go look. So when I saw Naked On The Run palette, I instantly fell in love. I. Must. Have. It. 


The palette is encased in a quite sturdy plastic case with rose gold color. The overlay on top of the case is an abstract look which I find really cool. My pictures do not do them justice, you have to see them in real life, and it’s amazing how the color seems to have that holographic effect. At the back of the case, they put the names of the shades and you can also see the pictures of what’s inside the case on the outer box packaging. Unfortunately, the NAKED writing on the case is easily scratched and loses its color. If you wanted to keep it neat, then try not to stack anything above the palette. 


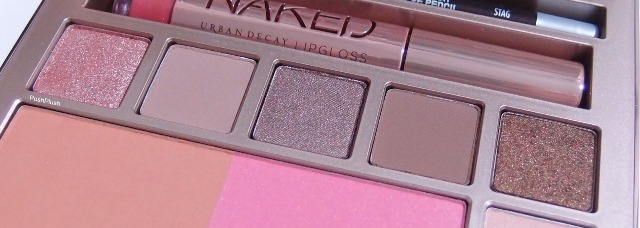
The palette consists of: one travel size Perversion mascara, one full size Naked Ultra Nourishing Gloss (Sesso), one travel size 24/7 Eye Pencil (Stag), a bronzer, a blush, five eye shadows, and one extra large all over shade shadow. 


Let’s start by looking at the eye shadows.


These are six never before seen shades from Urban Decay that is so versatile because you can use them to create a natural look or even glam it up with smoky eyes. I will try to explain the shades as best as I could here.
Dive : a light rosy gold shade with a sparkly finish. You might experience a little bit fall off when you apply the shade. Try to tap and press it to your lids rather than swipe your brush back and forth to prevent more fall off.
Fix : a dusty light brown with matte finish.
Resist : a medium taupe brown with sheen finish. My favorite color of them all.
Dare : a medium dark grayish brown with matte finish. My second favorite for my daily look.
Stun : a golden dark bronze with sparkly finish. I think it look amazing for night look but same case as Dive, you should be a little bit cautious when applying it to your lid because it fall off slightly.
5050 : a light beige with soft pearly finish. I mostly use this one for highlighting the parts of my face like nose bridge, cheekbones, and brow bones.

All the shadows texture is buttery, soft, and pigmented. None of them has chunky glitters or bad fall off when applied on the lid. They are easy to blend too! 

 
Next one is the Bronzer and blush. The bronzer is warm golden brown color with matte finish. I have to be very light-handed when I apply it because the color is pigmented. The bronze falls on the orange side on my skin, so if I’m not careful, I could end up with orange splotch on my face.

The blush is a medium bright pink with a shimmer finish. I have to be light-handed too when applying it because it is so pigmented. When you do, it will give you pretty pinkish cheeks.

On the swatch, I tried to show you the colors by blending them out. The outer left is how it looks if you combine both shades together equally. 


The Naked Ultra Nourishing Gloss in Sesso is encased in a rose gold tube with NAKED imprinted on the tube. I adore the packaging, it is so pretty! Sesso is medium rose color with gleaming shimmer. In the tube the color looks opaque but when it is applied on the lips, it’s really sheer; a sheen of rose color. The lipgloss is not sticky and the texture is not too thick, but it gives beautiful shine on the lips. I usually use it on top of my lipstick with the similar or deeper color. But if you wanted to achieve the naked look, you can also wear it alone without lipstick. 


Stag, has been my go to liner for every day wear now. The pencil is soft and creamy; makes it easy to draw your lines. Stag is a deep dark brown color that fits for everyday use. I always prefer dark brown liners when it comes to daily look because somehow I felt black liners is too fierce hehehe..  It is waterproof and the smudge is minimal. It usually last on me 8-10 hours depends on where I go or the weather that day. 

The Perversion mascara.. hmmm.. I chose to talk about it last because this is my least favorite part of the palette. First, let me tell you what kind of lashes I have. I have medium long lashes but they are straight and pointing down. My eyelash curler is my savior and afterwards, I will top it with a coat of mascara to give them volume and help them to stay curled up. But, unfortunately not all mascara works on my lashes because the wrong mascara will make my super lashes droop down again. Well, Perversion is one of those mascaras. 10 seconds after I applied it on my lashes, they started to wilt down and did not stay curled. Did it disappoint me? Yes, it did, but I know that my lashes are just picky. Due to that, I never really excited on trying new mascara and always going back to my trustworthy mascaras again (will talk about it more on other post). Aside from my picky eyelashes, perversion mascara claimed to be lengthening and volumizing your lashes without ever make it britty or clumped. 


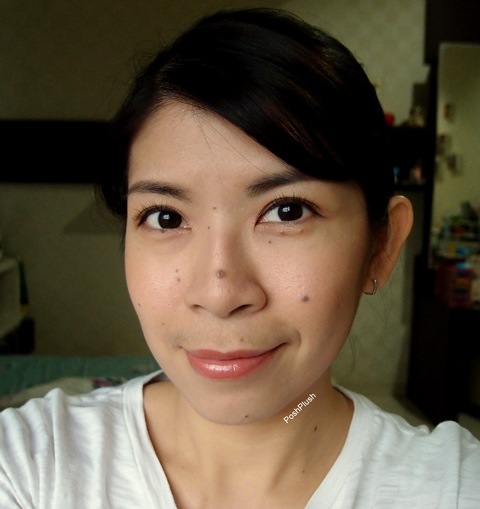
Here is the look that I made by using the palette (minus the mascara). I was using 3 shades of the eye shadow and only put one coat of the gloss without any lipstick on. 


First, I apply Dare on half of my lids and then topped it with Resist. Highlighted my brow bone and my under eye with 5050 and dab a little Dive on the inner corner of the eyes. I used Stag to line my eyes but not using Perversion in this look. As for cheeks, I lightly swiped it with the pink blush and then applied the bronzer to sculpt it a bit under the cheekbones. Unfortunately, the color does not really show here. 


If you wanted a bolder look, you can create smoky eyes by using Resist and Stun and add more liner to your eyes.

I personally think that the palette will be perfect if it comes with a travel size brushes. So, it is going to be all we need in one case. Despite that, I still like the palette and did not regret buying it at all. Tell me what do you think of it and do share your favorite on the run palette.

Cheers,
Stefi